3.1 Documentclass
LaTex recognizes several standard document classes. The most used classes are article, report and book. The default class for LaTex documents is article, which is a set of instructions to call other default options such as one-column layout, one-sided printing etc.
On the other hand, the report class is a macro (set of instructions) to typeset a multi-chapter document, though not with the same fine granularity as in the book class. The latter contains all the hooks and counters to output a professionally-typeset book.
Of course, there are defined classes for specific purposes, including writing resumes, a screen play, dissertations and classes specified by academic journals. The Comprehensive TeX Archive Network (CTAN) contains a comprehensive listing.
3.11 Paper size:
This specifies the physical size of the paper being output. The default size is a4, identified as a4paper, though legalpaper and letterpaper are standard in some geographies and professions. Here is a quick reference.
| Paper spec | Size (inches) |
| A4paper | 8.267 (w) X 11.69 (h) |
| Letter paper | 8.50 X 11 |
| Legalpaper | 8.50 X 14 |
| executivepaper | 7.00 X 10.5 |
| A5paper | 5.826 X 8.26 |
The standard article document class recognizes three ‘standard’ font sizes : 10, 11 and 12pt, of which 10pt is the default. Other sizes can be invoked by calling the extsizes classes--extarticle, extreport, extbook. These classes provide support for sizes 8, 9,10,11,12,14, 17 and 20 points.
The memoir documentclass has 12 font sizes: 9pt, 10pt, 11pt, 12pt, 14pt, 17pt, 20pt, 25pt, 30pt, 36pt, 48pt and 60pt while the beamer class for presentation has 8 font sizes: 8pt, 9pt, 10pt, 11pt, 12pt, 14pt, 17pt and 20pt. These are the most common sizes used in publishing. The appropriate class and font size is invoked in line #1.
\documentclass[14pt]{extarticle} or \documentclass[48pt]{memoir}. Changing the font size for a word or segment of the text can be achieved by calling:
\fontsize{font size}{base line stretch} \selectfont < Text segment >
Figure 3.12 summarizes the LATEX short codes for different font sizes.
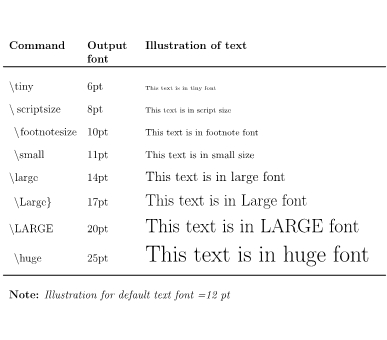
Figure 3.12 Font short codes
Just a reminder: the font size specification in the document class applies to the whole document. Local changes to fonts (families, weights, styles etc.) can be invoked in situ. Section 3.4 has details.
3.13 One-column or two-column layout:
Academic publishing often demands a two-column layout for text. While the default switch here is onecolumn, a two-column layout is specified with the switch twocolumn in line#1 of the documentclass specs, which would typically take the following form:
\documentclass[twocolumn, other options]{article}
It may be useful to note here that the column specs in the documentclass preamble apply to the whole document. It is possible to switch options for segments of text. For instance, to typeset page one in onecolumn, and subsequent pages in twocolumn, add \twocolumn before the text you want to split into two columns. Later you can revert to the standard onecolumn layout by calling the switch \onecolumn. Figure 3.13 illustrates the switch between onecolumn and twocolumn layouts.
| 1. \documentclass[12pt,a4paper]{article} 2. \usepackage[margin=1in]{geometry} 3. \usepackage{lipsum} % loads Lorem Ipsum, dummy text 4. \pagestyle{plain} %empty page with just page numbers 5. \begin{document} 6. \section*{\textbf{Switching between one-column and two-column layouts}} 7. \lipsum[2-5] 8. \newpage 9. \twocolumn %switch to two-coun layout 10. \lipsum[6-11] 11. \end{document} |
 |
 |
Figure 3.13 Twocolumn option
3.14 Draft and final mode:
Without running the risk of generalizing, it would be fair say that LaTex is most useful for large, multi-page documents and book publishing. Each of these specialized use cases tend to be media-heavy, loaded with graphics, pictures and other illustrations. The desktop processing throughput tends to deteriorate as the content grows in byte size.
LaTex provides a draft mode option to display only placeholders for media content within the documents. These placeholders are placed in the exact position where it would appear in the final document. The user has visual anchors without the burden of bytes. The Figure 3.14 illustrates the use and output of this switch.
| Draft mode | Final mode |
|
1. \documentclass[12pt,a4paper,draft]{article} 2. \usepackage[margin=1in]{geometry} 3. \usepackage{lipsum} % loads Loreum Ipsum, dummy text 4. \usepackage{graphicx,caption} 5. \pagestyle{empty} %empty page with just page numbers 6. \begin{document} 7. \lipsum[2-3] 8. \begin{figure}[htbp] 9. \begin{center} 10. \includegraphics{3.14 JWST image.png} 11. \renewcommand{\thefigure}{3.14} 12. \caption{The first anniversary image from NASA’s James Webb Space Telescope displays star birth like it’s never been seen before, full of detailed, impressionistic texture. \textbf{Credits: NASA, ESA, CSA, STScI, Klaus Pontoppidan (STScI)}. Copyright acknowledgment in Chapter 5.} 13. \end{center} 14. \end{figure} 15. \lipsum[3] 16. \end{document} |
1. \documentclass[12pt,a4paper]{article} 2. \usepackage[margin=1in]{geometry} 3. \usepackage{lipsum} % loads Loreum Ipsum, dummy text 4. \usepackage{graphicx,caption} 5. \pagestyle{empty} %empty page with just page numbers 6. \begin{document} 7. \lipsum[2-3] 8. \begin{figure}[htbp] 9. \begin{center} 10. \includegraphics{3.14 JWST image.png} 11. \renewcommand{\thefigure}{3.14} 12. \caption{The first anniversary image from NASA’s James Webb Space Telescope displays star birth like it’s never been seen before, full of detailed, impressionistic texture. \textbf{Credits: NASA, ESA, CSA, STScI, Klaus Pontoppidan (STScI)}. Copyright acknowledgment in Chapter 5.} 13. \end{center} 14. \end{figure} 15. \lipsum[3] 16. \end{document} |
 |
 |
Figure 3.14 Draft and final mode
Once the document layout has been finalized, switching to final mode will load all the media content. The default is the final option. Per usual workflows, use of the draft option will have to be expressly overwritten by the final option before final output.
3.15 Twoside or oneside printing:
This option instructs the compiler to structure the document in a back-to-back (two-sided) format or in a single side format. The defaults are oneside in article class and twoside in the book class.
Broadly, design considerations demand that the left and the right margins should be symmetrical in a one-side printed document. However in a two-side document structure, as in a book, the right margin on the left page and the left margin on the right page (hereinafter called the entire inner margin) should be the same size as each of the two outer margins; in other words, a single page contributes only half of the inner margin.
To set it more formally,
• In a one-side option: left margin = right margin;
• In a two-side option, left margin on left page = right margin on right page = right margin on left page + left margin on right page
The Figure 3.15 reports the code snippet and the layout produced in oneside (top row, right panel) and twoside options (bottom row panels).
| 1. % Default one side printing option 2. \documentclass[a4paper]{article} 3. \usepackage{layout, lipsum} 4. \pagestyle{plain} 5. \usepackage[margin=1in]{geometry} 6. \begin{document} 7. \section*{Example of oneside option; uniform inner and our margins} 8. \lipsum[1-7] 9. \newpage 10. \newgeometry{twoside} 11. \section*{Example of twoside option, note the inner and our margins} 12. \lipsum[8-18] 13. \end{document} 14. %The code below only for illustration 15. %Code for two side printing option %\documentclass[twoside, a4paper]{article} 16. %\usepackage{lipsum} 17. %\pagestyle{plain} 18. %\usepackage[margin=1in]{geometry} 19. %\begin{document} 20. % \lipsum[1-5] 21. %\end{document} |
.png) |
.png) |
.png) |
Figure 3.15 LATEX twoside option
3.16 Special document classes:
In this sub-section, we shall quickly review a few special document classes, notably
• The minimal class;
• The standalone class;
• The resume class;
• The beamer class.
3.16.1 Minimal class:
The minimal class is not what it suggests. It is not a class to produce a minimum working example (MWE). In fact, as Joseph Wright comments “the name of the class has regrettably led people to believe that it is intended for minimal examples, which was never the case.” Power users have commented in various places the minimal class is not even a real class in the strict sense because it does not handle font size changes. The default font size is 10 pts; font size modification commands such as \small and \large are not defined.
David Carlisle comments on the same page ”the minimal class was written just for testing the design of the latex2e package and class loading mechanism, just to check that there were no implied hidden dependencies on the standard article/report/book classes (which were of course the only ones existing for a while).” So it doesn't feature anything for typesetting real documents. Package author and community veteran Martin Scharrer comments “IMHO minimal is just a "hello world" class.”
What is it good for, then? While the absence of high level font modification macros has a definite impact on usability, a thin class could come in useful in situations where no text is presented, such as in a standalone graphics.
On balance, the "really minimal" class for typesetting purposes is the article class.
3.16.2 Standalone class: The standalone class is for typesetting content in isolation, without context or reference to the wrapping environment. This is useful in the specific use case where the design of the main document requires multiple images for inclusion. The workflow here is to compile the images separately in the standalone package, and import the output in the main document using the \input command. The main benefit here is that the user can readily compile the images independently and make modifications without compiling the whole document every time. The standalone class does not output content to a specified canvas, or a fixed paper size (A4, A3, etc.); rather it adapts to the content inside.
3.16.3 Resume class
A resume, for academic positions or corporate jobs, is supposed to be a snapshot of the timeline of the user’s academic/work profile. LaTex has a resume class {res} specifically designed to present the data in an elegant and precise fashion. This becomes specially relevant in modern times when resumes are almost always machine processed. The data scanning algorithms are trained to scan for hooks such as specific academic achievements, job skills, high points and timelines.
A distinction is often made between a CV and a resume; the former being a verbose narration of each entry when the writer is not certain what part of the entry will interest the reader. A resume, on the other hand, is designed to answer a specific requirement (academics/job-wise) and therefore there is merit in keeping the narration tight and focussed on the reader’s requirements.
The resume class –and is multiple avataars—therefore, provide for the barebones document structure, including:
• A document header
• Placeholders for contact information
• Body text
• Section headings
• List environment for individual entries within each section
• Above all, a flexibility to manipulate fonts and styles for visual effect.
The resume class is the subject of a much larger discussion, which is beyond the scope of this shopfloor guide.
3.16.4 Beamer class
The beamer class in LaTex is designed for producing slides for presentations. It can output either a pdf or a PostScript document. The class supports all demands of contemporary presentations, for academic or work-related tasks. It can include table of contents, list of figures and illustrations, tables, figures, logos, slide transition effects such as fade-in-left or fade-out-right, and timed animations.
The beamer document is made up of frames, with each frame incorporating a number of slides, set within the \begin{document} …\end{document} framework. Specifically, a beamer document is structured like so:
• Load beamer class
• Begin document environment
• Decide and choose theme to use
• Begin frame environment
• Add slides
• End frame environment
• End document environment
We have added an element above on themes. This entry defines the presentation theme. The Department of Information and Communications Engineering at the Autonomous University of Barcelona maintains a detailed repository of themes.
3.16.5 Memoir class
This class is for typesetting poetry, fiction, non-fiction, and mathematical works, and allows for creative use of chapter styles, page-styles, font combinations and layouts to suit the “creative edge.” Available font sizes range from 9 to 60pt. It is often called an extended form of the book class. The memoir manual notes, “the memoir class is an attempt to integrate some of the more design-related packages with the LaTex book class.” Why the memoir class stands out as a special class is its relative focus on the humanities. It does not expect the non-technical user to load up on all required packages and their default values. Instead, it incorporates the functions of a large number of commonly used packages to provide a more consistent interface, and is designed to be easy to customize.